
Saturday, March 10, 2012
Yoga Pose of the Day: Camel Pose
Camel Pose is a very stimulating and energizing pose. Also known as Ustrasana, Camel Pose compresses the spine, thus stimulating the nervous system and improving the flexibility of the spine and neck. It also stretches your chest and abs and massages your internal organs under the abdominals. The stretch extends into your quads and hip flexors.
This stretch is a great way to counteract all the forward bending we do all day, like hunching over a desk and/or computer.

1-Start by kneeling, your knees hips width apart. Your thighs need to be internally rotated and your shins and tops of your feet pressed against the floor. DO NOT flex your glutes!
2-Rest your hands on the back of your pelvis, fingers pointing down.
3-Begin to lean back. Slightly tuck your chin to your chest as do this.
Now this may be as far as you go, especially if you are new to this pose. Remember not to push yourself into any stretch. Stay within your limits.
4-If your body is feeling good at this point, take the stretch a little deeper by placing your hands at your ankles. Your thumbs are to be on the outside of your ankles and your fingers should point to your toes.
5-Raise your chest to the ceiling, creating length through your lower back. Allow your head to simply fall back, resting. Do not tense your neck. Relax.
6-Hold the pose at your farthest point of flexibility for three to four breaths.
7-To come back up, bring your hands back up to your lower back and pelvis, and, while taking a deep inhalation and leading with your chest, push through down into your pelvis and roll your back upright. Your head needs to come up last.
8-This is a good time to sit your glutes back onto your feet and extend your arms forward and expand your chest across the floor in Child's Pose. This will counteract the spinal compression you just completed with the Camel Pose.
Breathe.
This stretch is a great way to counteract all the forward bending we do all day, like hunching over a desk and/or computer.
1-Start by kneeling, your knees hips width apart. Your thighs need to be internally rotated and your shins and tops of your feet pressed against the floor. DO NOT flex your glutes!
2-Rest your hands on the back of your pelvis, fingers pointing down.
3-Begin to lean back. Slightly tuck your chin to your chest as do this.
Now this may be as far as you go, especially if you are new to this pose. Remember not to push yourself into any stretch. Stay within your limits.
4-If your body is feeling good at this point, take the stretch a little deeper by placing your hands at your ankles. Your thumbs are to be on the outside of your ankles and your fingers should point to your toes.
5-Raise your chest to the ceiling, creating length through your lower back. Allow your head to simply fall back, resting. Do not tense your neck. Relax.
6-Hold the pose at your farthest point of flexibility for three to four breaths.
7-To come back up, bring your hands back up to your lower back and pelvis, and, while taking a deep inhalation and leading with your chest, push through down into your pelvis and roll your back upright. Your head needs to come up last.
8-This is a good time to sit your glutes back onto your feet and extend your arms forward and expand your chest across the floor in Child's Pose. This will counteract the spinal compression you just completed with the Camel Pose.
Breathe.
Exercise of the Day: One-Arm Lunge Press
The One-Arm Lunge Press is a fantastic exercise because it hits a little bit of everything: quads, glutes, abs, and arms.
Step 1: To get into position, grab one dumbbell (DB) and hold it in your left arm. Have your elbow bent, even with your shoulder and your forearm going straight up, ready to press the DB up as if doing the military press. Then get into a lunge position, with your right leg forward and your left leg back. It should look like this:

Step 2: As you press through your right heel to come up from the lunge, do an overhead press with the DB in your left hand. Keep your torso straight, chest up and shoulders back.

Step 3: Come back down into the lunge, bringing your left elbow back down, even with your shoulder. You should be in the same position as you started in Step 1.
Repeat this motion 12 times. Then, switch the DB into your right hand, and do the same One-Arm Lunge press 12 times, this time doing the overhead press with your right arm and performing the lunge with your left leg forward and right leg back.
Enjoy!
Step 1: To get into position, grab one dumbbell (DB) and hold it in your left arm. Have your elbow bent, even with your shoulder and your forearm going straight up, ready to press the DB up as if doing the military press. Then get into a lunge position, with your right leg forward and your left leg back. It should look like this:
Step 2: As you press through your right heel to come up from the lunge, do an overhead press with the DB in your left hand. Keep your torso straight, chest up and shoulders back.
Step 3: Come back down into the lunge, bringing your left elbow back down, even with your shoulder. You should be in the same position as you started in Step 1.
Repeat this motion 12 times. Then, switch the DB into your right hand, and do the same One-Arm Lunge press 12 times, this time doing the overhead press with your right arm and performing the lunge with your left leg forward and right leg back.
Enjoy!
Friday, March 9, 2012
Yoga Pose of the Day: Wheel Pose
And now the stretch.......Wheel Pose. Please be careful before attempting this pose, as it is not in everyone's practice. You may want to practice Bridge Pose instead until your strength and flexibility allow you to go into Wheel.

So many benefits:
1-You stretch your chest and lungs.
2-You work your arms, wrists, legs, glutes, and all of your core.
3-Increases your energy.
4-Therapeutic for your body both inside and out.
Here's how to do it:
1-Lay on the floor, facing up. Your knees are bent and your feet are on the floor as close as they can be to your glutes.
2-Bend your elbows and place the palms of your hands on either side of your ears, fingers pointing towards your shoulders.
3-As you exhale, push into your feet and raise your torso up into the air, engaging your glutes and abs.
4-On your next exhalation, push into your palms and raise your shoulders so they are over your wrists.
5- Make sure your legs are parallel with one another, and your arms are parallel with one another.
6-Hold the pose for about three to four breaths.
7-To come out of it, slowly lower the back of your head to the ground, then bring your glutes back to the ground. Again, do this SLOWLY.
8-Repeat two or three more times.
Namaste
Yoga Pose of the Day: One-Legged Chaturanga
Friday! Friday morning=hot yoga and it was an amazing class today with Kathy Vanderselt! We did lots of shoulder openers and glute work, but if I had to pick one exercise that really got the class going, it would be all the One-Legged Chaturangas that we did.
This exercise is also known as One-Legged Four-Limbed Staff Pose and Eka Pada Chaturanga Dandasana.
1-Begin in Mountain Pose, standing straight, creating length in your spine, pushing through your heels into the floor and reaching through your head to the ceiling. Chest up and shoulders back!
2-On an exhale, swan dive down into Standing Forward Bend, only hinging at the spine, keeping the rest of your body in the same place. Take a deep inhalation.
3-With your palms on the floor, jump or walk your feet back into a plank as you exhale. Make sure your shoulders, elbows, and wrists are in one line, and your back is flat, glutes engaged. You are still reaching through your head and pushing through your heels, always creating length.
4. Lift your right leg only a few inches off the floor and lower yourself into a Chaturanga pushup, keeping your elbows next to your torso, and hovering barely over the floor for at least two deep breaths. Feel your triceps working, and squeeze your glutes to keep your pelvis even and your leg lifted.
5. Bring yourself into the Upward Dog pose, keeping your right leg lifted, and then on your next exhalation, send yourself back into Downward Dog.
6. From Downward Dog, bend your knees, and on your next exhalation, jump or walk your feet back up to your hands into Standing Forward Bend, and then swoop your arms back up into Mountain Pose.
7. Repeat this sequence, this time lifting your left leg as you do your Chaturanga pushup and Upward Dog.
Feel your upper body, abs, and glutes work like crazy!!!
Thursday, March 8, 2012
Snack of the Day: Lemon Ginger Green Tea
Green tea is a fantastic addition to your diet and has many health benefits to boot! Here is a list of a few that may be of interest to you:
1-The antioxidants in green tea are very powerful and help decrease a person's chances for cancer.
2-It reduces levels of bad cholesterol.
3-Green tea contains polyphenols, antioxidants which fight free radicals and help improve your life's longevity.
4-It inhibits the movement of glucose in cells, fighting obesity.
5-Green tea contains fluoride, which helps maintain bone strength.
6-It impedes the increase of sugar levels in the body because it increases the metabolism of glucose and lipids.
7-Green tea contains Cathechine, which fights the bacteria that causes food poisoning.
8-It's low in caffeine, helping you wean off the coffee, especially in the late afternoon and evening.

Here's an awesome recipe for lemon-ginger iced green tea. I love adding ginger because of its extra soothing benefits for the stomach.
Add two cups of water, one cup of sweetener of your choice, a teaspoon of ground ginger (I add more, because I love ginger), and a touch of lemon peel together into a saucepan and bring the mixture to a boil. Once it starts boiling, reduce the heat and gently boil it for eight minutes.
After eight minutes, add six green tea bags to the mixture and steep for ten minutes, consistently dunking and stirring the bags.
Remove the bags. If you would like, at this point add 4 tsps of fresh lemon juice and stir.
A really refreshing twist to this drink is to mix about 1/4 cup of the tea with 3/4 cup seltzer water. Ice it. Yum! Perfect for the summer weather that's approaching!
1-The antioxidants in green tea are very powerful and help decrease a person's chances for cancer.
2-It reduces levels of bad cholesterol.
3-Green tea contains polyphenols, antioxidants which fight free radicals and help improve your life's longevity.
4-It inhibits the movement of glucose in cells, fighting obesity.
5-Green tea contains fluoride, which helps maintain bone strength.
6-It impedes the increase of sugar levels in the body because it increases the metabolism of glucose and lipids.
7-Green tea contains Cathechine, which fights the bacteria that causes food poisoning.
8-It's low in caffeine, helping you wean off the coffee, especially in the late afternoon and evening.
Here's an awesome recipe for lemon-ginger iced green tea. I love adding ginger because of its extra soothing benefits for the stomach.
Add two cups of water, one cup of sweetener of your choice, a teaspoon of ground ginger (I add more, because I love ginger), and a touch of lemon peel together into a saucepan and bring the mixture to a boil. Once it starts boiling, reduce the heat and gently boil it for eight minutes.
After eight minutes, add six green tea bags to the mixture and steep for ten minutes, consistently dunking and stirring the bags.
Remove the bags. If you would like, at this point add 4 tsps of fresh lemon juice and stir.
A really refreshing twist to this drink is to mix about 1/4 cup of the tea with 3/4 cup seltzer water. Ice it. Yum! Perfect for the summer weather that's approaching!
Yoga Pose of the Day: Pyramid Pose
So you just went and did a tempo run...........and now your legs are aching. No worries! Today's Stretch of the Day is Pyramid Pose, or Parsvottonasana. So lovely for your hamstrings!

1-Start standing straight in Mountain Pose. Remember to lengthen your spine, pushing through your heels into the ground, stretching your head toward the ceiling. Also, keep your shoulders away from your ears and actively going into your back. Pretend your holding an orange between your shoulder blades, but not so tight as to juice it. Chest up!
2-Step your right leg back about 3 feet. Turn your right foot to a 45 degree angle, pointing away from your body.
3-Keeping your hips squared and even, exhale and start to bend over your left leg. Remember to lead with your chest and not your head! You want to keep your back nice and flat, not rounded. The only movement is at your hips!
4-On your next inhale, raise your torso slightly. When you take your exhale, bend further into the stretch over your leg.
5-DO NOT FORCE THE STRETCH! Only go as far as your body will allow. Remember the more you practice the stretch overtime, the more flexible you will get overtime.
6-Don't forget about keeping your hips square!!!!!!!
7-After four or five breaths, come back up into Mountain Pose, then switch legs, this time stepping your left leg back and bending over your right foot.
ENJOY!!!
Workout of the Day: Tempo Run
You hear it all the time when you're training for a race: Go do a tempo run. What exactly is a tempo run though?
Basically, a tempo run is when you run for 20 minutes at your lactate threshold. For most people, this pace is equal to about 25-30 seconds slower than your 100% 5K pace. If you know your heart rate maximum (HRM) number, your heart rate during a tempo run is 90% of your HRM. Or, if you just want a simple two-word explanation, a tempo run should feel "comfortably hard" and can be held for about an hour during a race.

Tempo running is most useful when running at least a 15K because your success largely relies on your body's endurance, rather than an all out sprint. What is most important when doing a tempo run is that you 1) KEEP CONSISTENT PACE and 2) KEEP A SPECIFIC PACE. That being said, tempo runs can be varied based on your course, the type of race you are doing, and your own personal running style. So as long as you set out with a specific plan, have fun with the workout.
If you are still confused on pacing, here's a tip: pick your favorite upbeat song and pace your run by keeping beat with the song.
So go make a playlist that includes 20 minutes worth of fast tempo songs, remember to do at least a 5-10 minute warm-up and cool-down jog, and start working tempo runs into your running program today!
Happy Thursday!
Basically, a tempo run is when you run for 20 minutes at your lactate threshold. For most people, this pace is equal to about 25-30 seconds slower than your 100% 5K pace. If you know your heart rate maximum (HRM) number, your heart rate during a tempo run is 90% of your HRM. Or, if you just want a simple two-word explanation, a tempo run should feel "comfortably hard" and can be held for about an hour during a race.
Tempo running is most useful when running at least a 15K because your success largely relies on your body's endurance, rather than an all out sprint. What is most important when doing a tempo run is that you 1) KEEP CONSISTENT PACE and 2) KEEP A SPECIFIC PACE. That being said, tempo runs can be varied based on your course, the type of race you are doing, and your own personal running style. So as long as you set out with a specific plan, have fun with the workout.
If you are still confused on pacing, here's a tip: pick your favorite upbeat song and pace your run by keeping beat with the song.
So go make a playlist that includes 20 minutes worth of fast tempo songs, remember to do at least a 5-10 minute warm-up and cool-down jog, and start working tempo runs into your running program today!
Happy Thursday!
Wednesday, March 7, 2012


Snack of the Day: DIY Yogurt Covered Fruit
Easy snack to make for yourself? Make your own yogurt covered fruit!!! So simple.
Get yourself some yogurt (Greek yogurt if you can for its added health benefits). Dip your fruit of choice into the yogurt (strawberries, blueberries, cherries, etc.) and then freeze what you have made in an air-tight concealer overnight!
Genius!


Get yourself some yogurt (Greek yogurt if you can for its added health benefits). Dip your fruit of choice into the yogurt (strawberries, blueberries, cherries, etc.) and then freeze what you have made in an air-tight concealer overnight!
Genius!
Snack of the Day: Low-Fat Blueberry Bran Muffins
High Fiber? Check.
Low-Fat? Check.
Delicious? DOUBLE CHECK!!
I have used this recipe before to make sure that I keep fiber in my diet in a healthy way that also happens to be delicious.
It's really simple and most likely you already have all the ingredients at your house, and, if not, they are easily found at your local grocery store and can be bought on the cheap!
Bon Appetit!
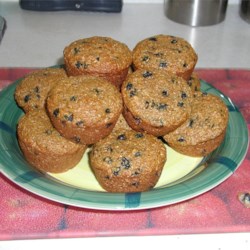
http://allrecipes.com/recipe/low-fat-blueberry-bran-muffins/
Low-Fat? Check.
Delicious? DOUBLE CHECK!!
I have used this recipe before to make sure that I keep fiber in my diet in a healthy way that also happens to be delicious.
It's really simple and most likely you already have all the ingredients at your house, and, if not, they are easily found at your local grocery store and can be bought on the cheap!
Bon Appetit!
http://allrecipes.com/recipe/low-fat-blueberry-bran-muffins/
Yoga Pose of the Day: Cow Face Pose
We all get tight in the shoulders and could use some relief, right?
My softball players that I work with have exceptionally tight shoulders and arms from how much they practice, and one stretch that I always have them incorporate into their daily routine is the Cow Face Pose. This stretch goes deep in the shoulder cuff, releasing built up tension, and also helps strengthen the back muscles, giving your shoulder muscles extra support.

Here's how to do it:
1. Sit in a cross-legged position with your butt on the floor and your spine straightened. Remember to sit as if your body is being pulled in opposite directions: toward the ceiling and into the floor through your spine.
2. Raise your right arm straight up, then bend at the elbow and place your right palm on your back.
3. Take your left arm out to the side with your palm facing backwards and your thumb pointing down. Bend at the left elbow and place your left hand at your back, palm facing outwards.
4. Try to lace your fingers together while actively extending your right elbow towards the ceiling.
5. It is perfectly alright if you cannot lace your fingers. You can still get a good stretch in by leaving your hands in the position that they are originally in on your back, or you can get a towel and hold the ends of the towel in each hand behind your back and actively pull the ends of the towel away from each other.
6. Remember to do this pose at your body's limit of flexibility and not force the stretch.
7. Return to the starting position and switch arms, with your left hand on top of your back, palm against your body, and your right hand on the bottom, with your right palm facing outwards.
Enjoy!
My softball players that I work with have exceptionally tight shoulders and arms from how much they practice, and one stretch that I always have them incorporate into their daily routine is the Cow Face Pose. This stretch goes deep in the shoulder cuff, releasing built up tension, and also helps strengthen the back muscles, giving your shoulder muscles extra support.
Here's how to do it:
1. Sit in a cross-legged position with your butt on the floor and your spine straightened. Remember to sit as if your body is being pulled in opposite directions: toward the ceiling and into the floor through your spine.
2. Raise your right arm straight up, then bend at the elbow and place your right palm on your back.
3. Take your left arm out to the side with your palm facing backwards and your thumb pointing down. Bend at the left elbow and place your left hand at your back, palm facing outwards.
4. Try to lace your fingers together while actively extending your right elbow towards the ceiling.
5. It is perfectly alright if you cannot lace your fingers. You can still get a good stretch in by leaving your hands in the position that they are originally in on your back, or you can get a towel and hold the ends of the towel in each hand behind your back and actively pull the ends of the towel away from each other.
6. Remember to do this pose at your body's limit of flexibility and not force the stretch.
7. Return to the starting position and switch arms, with your left hand on top of your back, palm against your body, and your right hand on the bottom, with your right palm facing outwards.
Enjoy!
Exercise of the Day: Single-Leg Deadlift
The glutes and the hamstrings.....very often overlooked yet oh so important for strength and injury prevention!
Most of my clients will tell you that I go on and on about the importance of strengthening these key muscles. The glutes and the hamstrings are what keep your pelvis aligned and provide a foundation for your balance. When your glutes and hamstrings are weak, it affects your entire body and how successfully it functions.
One exercise you can include into your workout to help strengthen your glutes and hamstrings is the single-leg deadlift.

Here's how to do it:
1. Keep your shoulders active (think of holding an orange between your shoulder blades but don't squeeze hard enough to juice it) and away from your ears. Straighten your back and keep your chest up to prevent rounding in the back. This is especially important if you are using weights.
2. Raise your left leg behind you, flexing your left foot, and grounding yourself through your right heel. Push through your right heel and lengthen your spine by stretching your head towards the ceiling. You can maintain a slight bend in your right knee to protect the joint.
3. Now hinge at the waist, bringing your hands toward the ground. When your back and left leg are parallel to the floor, hold for two counts. The only movement is at the waist. Keep your shoulders back and active and your chest out; this will prevent your shoulders from rolling forward, which creates unnecessary tension in the neck and along the spine.
4. Also, keep your pelvis parallel to the floor. Your body will want to tip into the stable leg to have better balance, but this puts unnecessary pressure on your hip joint. To readjust your torso to being even, engage your core muscles in your abs and back. Remember that this is a challenging balance exercise and your core muscles are your best friends for success!
5. SLOWLY, and I mean SLOWLY, squeeze the back of your right leg and your glutes to bring you back up to the starting position. This is the most important part of the exercise, so DO NOT RUSH through this.
6. Repeat this, keeping your right foot on the floor for a total of 12 repetitions. Switch to your left leg being the stable leg and do 12 repetitions.
7. Do three sets on each leg.
Enjoy!
Most of my clients will tell you that I go on and on about the importance of strengthening these key muscles. The glutes and the hamstrings are what keep your pelvis aligned and provide a foundation for your balance. When your glutes and hamstrings are weak, it affects your entire body and how successfully it functions.
One exercise you can include into your workout to help strengthen your glutes and hamstrings is the single-leg deadlift.
Here's how to do it:
1. Keep your shoulders active (think of holding an orange between your shoulder blades but don't squeeze hard enough to juice it) and away from your ears. Straighten your back and keep your chest up to prevent rounding in the back. This is especially important if you are using weights.
2. Raise your left leg behind you, flexing your left foot, and grounding yourself through your right heel. Push through your right heel and lengthen your spine by stretching your head towards the ceiling. You can maintain a slight bend in your right knee to protect the joint.
3. Now hinge at the waist, bringing your hands toward the ground. When your back and left leg are parallel to the floor, hold for two counts. The only movement is at the waist. Keep your shoulders back and active and your chest out; this will prevent your shoulders from rolling forward, which creates unnecessary tension in the neck and along the spine.
4. Also, keep your pelvis parallel to the floor. Your body will want to tip into the stable leg to have better balance, but this puts unnecessary pressure on your hip joint. To readjust your torso to being even, engage your core muscles in your abs and back. Remember that this is a challenging balance exercise and your core muscles are your best friends for success!
5. SLOWLY, and I mean SLOWLY, squeeze the back of your right leg and your glutes to bring you back up to the starting position. This is the most important part of the exercise, so DO NOT RUSH through this.
6. Repeat this, keeping your right foot on the floor for a total of 12 repetitions. Switch to your left leg being the stable leg and do 12 repetitions.
7. Do three sets on each leg.
Enjoy!
Monday, March 5, 2012
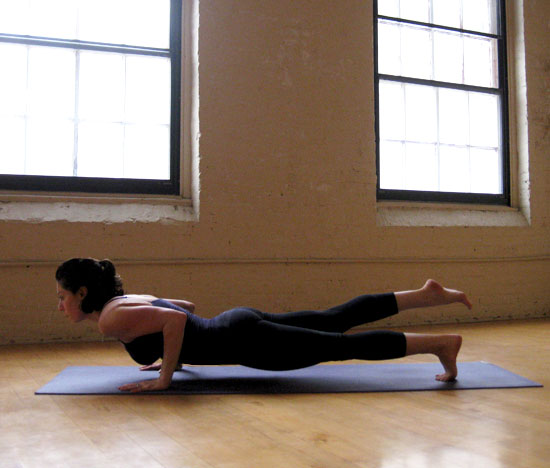
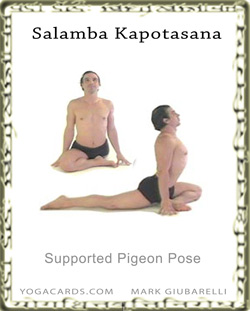
Yoga Pose of the Day: Pigeon Pose
If you just did the Chair Pose Squat Jumps, then your glutes are going to be most appreciate for this stretch. The pigeon pose, or Salamba Kapotasana, is a hip opener that is fantastic in relieving tension in the glutes, IT band, and upper thigh. Do not be intimidated by the picture below!!! You can ease into the pigeon pose at your rate of flexibility!
There are many ways to get into this position, but I will explain the method which I most commonly use.
1-Across the length of a mat, begin in Downward Dog position .
2-Bring the knee of your right leg forward and position your shin as parallel to the edge of the mat as your body allows.
3. With your core as upright as possible and your chest up, begin to lower your core straight down towards the mat. Only go down as far as your body allows. Do NOT force the stretch. It is perfectly alright if you cannot stretch all the way down to the mat!
4. You can use your hands to help keep you upright (as depicted in the picture), or, if your flexibility allows, you can begin to walk your hands out in front of you to get a deeper stretch.
5. Return back to the Downward Dog position in the same manner in which you left it and repeat on the left side.
Namaste.
Exercise of the Day: Dynamic Chair Squats
It's Monday! Time to start your week off right with a great workout for your core and your legs! This is a variation on the Chair Pose from yoga.

To get into position, sit your butt back just like you are about to sit in to a chair. It is very important that it is your butt going backwards; you want to avoid your knees going in front of your toes because this can cause damage to your knees. Try to create as close to a 90 degree angle at your knees as possible, or think about bringing your thighs parallel to the floor.
Keep your upper body as upright as possible. and raise your arms in front of you, reaching for the ceiling. Lengthen through your spine.
Now that you are in Chair Pose, begin to do squat jumps, maintaining the Chair Pose position as best as possible each time you jump.
To make this a nice mix of plyometric and isometric (working your muscles by holding them still in a flexed position), try this:
Do 12 chair squat jumps and at the end of the 12th jump, hold the chair position for a count of 10. Repeat this for 1 minute.
You'll feel this exercise in no time!
Subscribe to:
Posts (Atom)