Hello everyone!
Getting a lot of requests for lower body and core moves again, so today's Exercise of the Day is the Dumbbell Side Lunge and Touch.
This move works your entire lower body and core and there are not the many steps. Plus, you can do it without the dumbbells and just use your own bodyweight as resistance if you do not have any equipment handy.
1-Start standing straight, with the dumbbells in each hand, resting at your sides. Be sure that you are creating length in your spine, chest up, shoulders down and back. Have your core and your glutes activated.
2-Step your right leg out to the side, slightly forward of your body, and let yourself come down into a lunge. Be sure to step far out enough that your knee does not bend past your toes.
Form Tip: Make sure that your glutes go straight down and keep your chest and head up. Keep your right thigh parallel to the ground so you do not externally rotate your leg and cause strain to your knees and hips. Your left leg stays straight.
3-Touch the dumbbells so that they straddle your right foot.
4-Pushing through your right heel, return back to the starting standing position.
Repeat this lunge 12-15 on your right leg, then switch sides. Do 3 sets on each leg.
Enjoy!
"The greatest gift you can give another is not your treasure but to show them their own."
Saturday, March 24, 2012
Healthy Tip of the Day: Cut out the Soda
So by now we have all heard that soda is not good for you and by eliminating it from your diet you may lose pounds instantly! But what about the people who have a hard time kicking the habit? The following article from Men's Health has tips on how to cut back on soda but still fulfill the cravings that hard to get over:
http://fitbie.msn.com/eat-right/tips/kick-your-soda-habit-and-drop-pound-week
So go ahead and try it for at least a week and see how you feel!
http://fitbie.msn.com/eat-right/tips/kick-your-soda-habit-and-drop-pound-week
So go ahead and try it for at least a week and see how you feel!
Friday, March 23, 2012
Exercise of the Day: Front Squat with Barbell Press
I once asked a weight lifting coach that if he had to pick one weight conditioning exercise to do for the rest of his life, and he was not allowed to do any other, what exercise would he pick? The answer was the Front Squat Press.
When you do a front squat press, you are truly doing a total body weight and cardio workout. You are working your glutes, quads and hamstrings throughout the squat, and your shoulders and arms while doing the press. Your core is constantly activated and working hard the whole time.
1-Start standing straight, barbell in hands, resting at your waist.
2-Bend your elbows your hands come up in front of your shoulders and your forearms are facing away from your body. It is very important to keep your wrists active and in line with your forearms. Letting your wrists extend too far backwards is going to cause a lot of unnecessary pain and strain!
3-With your legs about hip width apart, come down into a squat. Stay pushing into your heels, keeping your knees behind your toes. Stop when your thighs are parallel to the floor.
4-As you push through your heels to come back up to standing, exhale and begin to press the barbell overhead. Again, stay in your heels, as this will provide stability. Really flex your core-this will prevent you from arching your back and help you maintain the shoulder press.
5-Slowly hinge your elbows back down in front of you to the starting position, resting the barbell at chest level.
Repeat this exercise 8-10 times.
Congrats! You just worked everything!
Enjoy!
Thursday, March 22, 2012
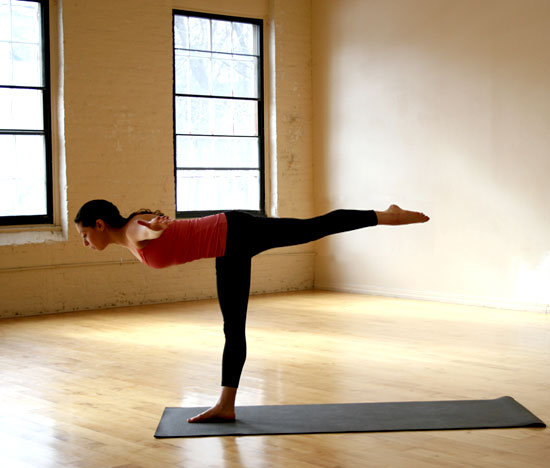
Yoga Pose of the Day: Warrior 3
Just like the Exercise of the Day, the Yoga Pose of the Day focuses on having a lot of core strength.
Warrior 3 requires balance, works your core throughout the pose, and builds strength and tone in your glutes and hamstrings. Perfect!
1-Start in Mountain Pose, standing straight up, lengthening through your spine.
2-Shift your weight onto your right leg as your raise both arms overhead, parallel to one another and reaching to the ceiling while keeping your shoulders away from your ears and pressing down into your lower back.
3-As you exhale, begin to hinge at your waist, bringing your torso forward and raising your left leg backwards. This needs to be a slow and controlled movement. Imaging that your left leg and torso are connected, so they need to move the same distance and the same speed.
4-As you hinge further forward, activate your core, hamstrings, and glutes, especially in your right leg, to ensure stability.
5-When your chest and left thigh are parallel with the floor, stop hinging, and hold the pose. Keep extending your arms, now imagining that they are reaching towards the wall in front of you.
6-At some point while you are holding the pose, you may bring your arms out to the sides, even with your shoulders, and reaching to the left and right (see picture above).
7-After holding the pose for five breaths, take an inhalation and slowly and with control, raise your torso and lower your left leg until you are back in Mountain Pose.
Repeat the sequence, this time shifting your weight onto your left leg.
Namaste!
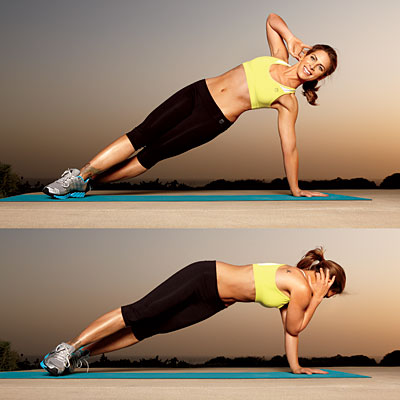
Exercise of the Day: Side Plank Crunches
As requested, I'm going to feature an ab exercise that hits all areas of your core as our Exercise of the Day. After all, it's getting warmer even faster than normal, and we want to be ready!
Side Plank Crunches are excellent for working your core, focusing on your obliques. The cross body motion makes sure that the entire horizontal portion (transverse abdominus) of your abs get worked, and you are also working on your core by keeping your balance. Your shoulders do stability work as well.
1-Start in the standard plank position, the front side of your body facing down.
2-Rotate your body, bringing the right side of your body upwards, your left arms and shoulder stabilizing your upper body. Your feet can be staggered, left foot behind right.
Form Tip: Make sure that your left wrist, elbow, and shoulder are in line. Also be sure that your body is straight. You are still in a plank, so you do not want your hips behind your chest and feet. If they are, tip your pelvis forward and activate your glutes so your body in one straight line from head to toe.
3-.Bend your right elbow and bring your right hand to the back of your head.
4-As you exhale and tighten your entire core, crunch the right side of your upper body across your torso until you are facing straight down.
5-Slowly and with control, bring yourself back into the straight side plank.
6-Do 15-20 repetitions, and the do a set of Side Plank Crunches on the other side of your body, your right arm stabilizing you to the floor.
Do 3 sets on each side.
Feeling good about your balance? Try the Side Plank Crunch with the leg on top raised. Your core will be working over time!!
Enjoy!
Wednesday, March 21, 2012
Healthy Tip of the Day: One Serving of Fruit
We all know that we need to eat 2 to 3 servings of fruit a day (depending on our age, sex, and personal diet needs), but what exactly constitutes one serving of fruit? Here's a list of one serving equivalents to help guide you.
Have a Great Day!
- 1/2 banana
- 2 small plums
- 1 peach
- 1 cup of berries
- 1/2 cup pineapple chunks
- 1/2 papaya
- 2 kiwis
- 1 apple
- 15-20 grapes
- 1 orange
- 1 cup melon chunks
- 1/2 mango
- 15-20 cherries
- 1 pear
Have a Great Day!
Yoga Pose of the Day: Sun Salutation A
Every morning I like to wake up and begin my day with a nice cup of tea and a few rounds of Sun Salutation A, or Surya Namaskar.
The Sun Salutation is a series of 12 postures that performed in a particular order in a flowing, non-stop manner. The transitions between each posture is dependent on your breathing. The order of postures is set up so that they contrast the previous and folllowing postures; this give your body and muscles the best stretch and invigoration you need to start your day and loosens up your joints.
.
1-Being in Mountain Pose.
2-As you inhale, raise your arms overhead, creating a slight backbend.
3-On your exhalation, swan dive your arms down to your feet, to create Forward Fold. Keeping your torso straight and active, only hinging at the waist. Remember, lead with your chest, not your head.
4-Inhale and place your left leg back behind you and come down into Crescent Pose.
5-As you exhale, bring your right leg back to meet your left and hold yourself in a plank.
6-On your next exhalation, perform Chatarunga.
7-Inhale into Upward Dog.
8-Exhale into Downward Dog.
9-On your next inhalation, bring your right leg forward into Crescent Pose.
10-Exhale, bringing your left foot up to meet your right and come into Forward Fold.
11-As you take your next inhalation, swan dive your arms upwards, over your head, creating a small back bend.
12-Exhale and bring your body back to Mountain Pose.
Repeat the series at least three times.
Enjoy and Namaste.
Exercise of the Day: BOSU Squat Thrust Burpees
I haven't featured an exercise using a BOSU yet, so here it is! Today's Exercise of the Day is.....Squat Thrust Burpees!
By adding the use of a BOSU to a standard squat thrust burpee you add instability, forcing you to work your core to maintain your balance. It also challenges the stability of your shoulders. BOSUs are typically found in all gyms nowadays and can also be readily purchased for home use, online or even at your local Target. So no excuses!
1-Hold a BOSU by its handles, the flat side facing your body.
2-Come down into a squat and place the rounded part of the BOSU on the ground.
3-Kick your legs back into a plank position. Remember to keep your core activated to maintain your balance.
4-Hold the plank for about two counts. You can add a pushup at this point for added upper body work.
4-Jump your legs back into a squat.
5-Come back up into a standing position.
6-Press the BOSU overhead.
Do as many repetitions as you can in a minute. Rest for 30 seconds then repeat for another minute. Do a total of 3 sets.
Enjoy!
Tuesday, March 20, 2012
New Layout? Feedback Please!
Hey everybody! I'm trying a new layout for my blog which makes my posts more visible and accessible. Let me know if you like it or want me to go back to the old layout!
Snack of the Day: Spinach and Strawberry Smoothie
Anyone who knows me knows that I love my spinach! Mix it with fruit and keep it simple and healthy....YUM!
I came across this smoothie recipe on the Eat Good 4 Life blog: (http://eatgood4life.blogspot.com/2011/05/spinach-and-strawberry-smoothie.html) and it is so simple and delicious. Not only does it have spinach, but berries, bananas, and even incorporates good old flax seed. This smoothie can also be used as a good way to sneak in spinach into people's diets without them knowing! The ingredients in the recipe can also be easily substituted out with others in case you want a non-dairy or vegan smoothie. It's versatile, delicious, easy, and you get your fruits and veggies in one hit!
Blend together 6 oz of spinach, 8 oz of strawberries or raspberries, 1/4 cup of honey (you can substitute agave nectar here is you want to take the vegan route), 1-2 ripe bananas, 4-5 cups of soy or skim milk, and 1/4 cup of flaxseed.
CHEERS!
Yoga Pose of the Day: Locust Pose
A lot of times people are only focused on strengthening their abs and forget that a strong back is just as important for a perfect core. A yogo pose which targets back strength is Locust Pose, or Salabhasana. In addition to strengthening your back, this pose works your entire backside, especially your glutes and hamstrings, as well as your shoulders.
1-Lie face down on your mat, your arms stretched down by your sides and your palms face up. Create length in your spine, extending through your feet and your head.
2-Activate the insides of your legs and tilt your pelvis forward so your lower abs are resting flat against the floor.
3-As you exhale, activate your legs so that they are lifted off the floor and activate your shoulders and upper back, so that your chest raises off the floor. Keep the sensation that you are lengthening through your spine. Your glutes are going to be working overtime!
4-Raise your arms so that they are even with your shoulders and parallel with one another. Keep your gaze towards the floor, creating length in your neck. This will ease strain on your neck. Overtime, you may begin to look forward, but don't strain your neck if you don't have to.
5-Reach back with your arms, further engaging your back and bringing your shoulder blades together.
6-Hold this pose for five breaths and then slowly bring your body back flat on the floor. Repeat two more times.
Namaste!
Exercise of the Day: Bulgarian Split Squat
The Bulgarian Split Squat works your glutes, hamstrings, quads, and strengthens your ankles......so if you're looking to work your lower body and get it all done at once, this is the exercise for you! I especially like this exercise because, since you are only stable on one leg, you work on your balance and strengthen your core!
1-Hold a pair of dumbbells in each hand and stand in front of a bench or chair that is at least knee height.
2-Place your left foot back onto the bench, top of your foot facing down.
Now this is a perfect time to make sure your body's position is correct. You may need to hop your body a little forward or backward. The distance between your body and the bench needs to be enough so that you can bend your front leg into a lunge and your front knee stays directly above your front foot. Your front leg will be placed a little in front of your torso. Protect your knees!
Also, you want to be sure that your legs stay hip distance apart. Sometimes during this exercise, the back leg moves too far inwards. If attempting this exercise alone, make sure you can see yourself in a mirror to adjust properly.
3-Lower your body into a lunge, keeping your torso upright. Stop lowering yourself when your front thigh becomes parallel with the floor.
4-Slowly and with control, push through the heel of your front leg and raise yourself back into the starting position.
5-Repeat the exercise for a total of 12-15 repetitions. Switch legs and repeat the exercise for the same amount of repetitions. Do three sets of the Bulgarian Split Squat on each leg.
ENJOY!
Monday, March 19, 2012
Yoga Pose of the Day: Dancer Pose
Dancer Pose, or Natarajasana, is such a wonderful pose! Not only does it work your entire body, but it is so beautiful to look at and is the picture of grace, control, and balance in one's body.
Dancer Pose is a great pose because it can be modified for anyone, regardless of balance or flexibility. The best instruction I have ever received in practicing Dance Pose was while taking classes at Hot House Yoga in Iowa City, IA, (http://www.hothouseyoga.com/) during Scott's classes, and I will try my best to put into writing here his great instruction.
1-Stand in Mountain Pose, lengthening through your spine and really finding yourself grounded.
2-Shift your weight onto your right foot.
3-Once you feel grounded into your right foot, extend your right arm straight upwards, and bring your left arm behind you.
4-Raise your left foot to your left hand. Take your left hand to the big toe side of your left foot and grasp your left ankle.
You can modify at this point and use a towel to wrap around your ankle and hold in case your flexibility does not allow for you to bring your leg all the way to your hand.
5-As you exhale, begin to kick into your left foot into your left hand, creating resistance and extension of your leg. Do not immediately tip your torso forward. Focus on the backside of your body right now.
6-When it is time to inhale, reground yourself, then exhale, and further the active stretch of your quads, pushing your left foot into your left hand.
7-Your leg extension will get you to a point, where your torso will naturally begin to tip forward. Work with the movement. Keep your torso active and controlled.
8-As you further the stretch in your back leg and your body moves forward, extend your right arm forward. This will create a push and pull motion in your body: your leg pushing backward, and your arm moving forward as if being pulled away from your core.
9-When you are able to hinge your torso so that it is parallel to the floor, stop and hold the pose for five to seven breaths.
10-Slowly and with control, bring your torso back upright, lower your left leg to the ground, and then repeat the pose, this time with your body weight shifted onto your left foot and your right leg extended behind you.
Namaste!
Exercise of the Day: Leaning Extension
Triceps and core come together to get you through the leaning extension! This exercise can be done using a weight stack or by using resistance bands, so it can be executed inside and outside of a gym.
This image was taken from the workout Nicole Scherzinger uses to keep her abs in gear, as featured in SHAPE magazine.
1-Stand facing away from where the weights or resistance tubes are anchored, feet about shoulder-width apart. If you are at an 8-stack and have multiple apparatus to chose to from, I prefer to do this exercise with the ropes.
2-Reach back and take the handles from your ropes or tubes, and bring it overhead, elbows bent and forearms facing the ceiling.
3-Lean your body slightly forward. This is where you engage your entire core to keep you steady and upright.
4-Using your triceps, extend your forearms forward until your arms are straight.
5-Slowly and with control, bend your elbows, resisting the movement, and bring your forearms back to the starting position.
6-Repeat this motion 12-15 times. Rest for about 1 minute and do 2 more sets.
If you're really in the mood to work your triceps, after each set of leaning extension, turn around and face the weights or tubing and do 12-15 reps of tricep pushdowns with the tubes or rope. Make sure you do bicep curls during this workout too, to balance your arms out!
Enjoy!
Sunday, March 18, 2012
Yoga Pose of the Day: Bound Fan Pose
After a long Sunday run, the Bound Fan Pose will be a huge relief to your legs, especially the insides of your legs and your hamstrings.
1-Take a wide stance, keeping your feet parallel.
2-Interlace your hands behind your back. This is a good time to be sure that your shoulders are activated, down away from your ears and moving into your spine and lower back. You want your torso straight and lengthened.
3-With a slight bend in your knees, take an exhalation and bend at your hips. Keep your back straight and lengthened. Lead with your chest, not your head!
4-As you fold your chest forward, down towards the floor and between your legs, focus on activating the insides of your legs and your hamstrings. By engaging the muscles you want to stretch, you protect them and further increase their flexibility during the stretch.
5-When your chest has come down as far as you can take it, begin to straighten your legs, but only to the point that you feel a good stretch in the back of your legs. If you push too far, you will hurt your knees and your muscles. Also, you need to keep your back straight.
6-Don't forget your arms behind your back! You want to extend your hands, still interlaced, straight upwards to the ceiling, giving your shoulders a nice stretch.
7-Hold this pose for five to seven breaths. On your next exhalation, slowly bring yourself back upright, bending only at the hips and keeping your back straight.
Namaste.
Workout of the Day: Running in Hot Temperatures
Happy Sunday!
For runners training for long distance races, Sundays usually mean the long runs. In St. Louis in the spring, these long runs are easily defined by the weather changing quickly from being really nice with a pleasant breeze to extremely humid and stagnant.
Ah, the joys of the weather changing to summer-like temperatures! This also made me remember how last year's half and full marathon in St. Louis in April was cut short for many runners (both by the officials and some runners simply got heat stroke) because of the crazy heat. This year much of the United States has also been experiencing above normal temperatures, so I decided to use today to give tips on how to properly train yourself in these rising temperatures!
1-You need to be acclimatized to heat before you race in it. It typically takes 7 to 14 days for your body to adjust to heat, so keep that in mind!
2-You need to be well-rested (at least 7 hours of sleep the night before).
3-Are you hydrated? This should be obvious as important, but you'd be amazed at how many people forget to hydrate properly.
4-Are you healthy?
5-Have you eaten properly?
6-Are you on any medications that may affect your body temperature regulation?
Here's a link from Runner's World that is a story on how runners from some of the hottest and muggiest areas of the U.S. deal with training in the heat: http://www.runnersworld.com/article/0,7120,s6-238-267-269-11984-0,00.html
So go out there prepared and avoid injury and sickness caused by the heat so you can dominate that half or full marathon later this spring!
Subscribe to:
Posts (Atom)