Saturday, March 17, 2012

Yoga Pose of the Day: Crescent Pose

Just in case you can't get enough of isometric poses to work your legs (see Exercise of the Day: One-Legged Wall Sit post), the Yoga Pose of the Day is Crescent Pose.

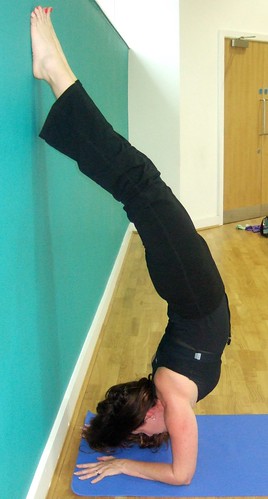
Crescent Pose is an isometric lunge that works your quads and your balance, giving you a great lower body and core workout. The static hold in your arms, shoulders, and chest ensures that your upper body also is getting a strength workout, and the repetitive movement of your head from below to above your heart center adds an additional cardio benefit to the exercise.


1-Start in Downward Dog Pose. Take three deep breaths to settle your body.
2-On your next exhalation, step your left foot forward to the inside of your left palm. Your knee needs to be directly above your ankle. Keep your right leg active and strong to help maintain your balance and keep your pelvis even.
3-When you take your inhalation, sweep your arms upwards and bring your torso to an upright position. Your arms will stop when they are perpendicular to the ground.
4-Reach your arms towards the ceiling, palms facing each other. While you sink your body into the lunge, keep your left thigh parallel to the ground and your right leg in a straight, flexed position behind you.
5-Hold the position for five deep breaths. If you need to modify, take your right knee to the ground.
6-On your next exhalation, sweep your arms back down, placing your palms down on the ground.
7-Step your left foot back even with your right foot and return to Downward Dog Pose.
8-Repeat the pose, this time bringing your right leg forward.

Do the exercise three to four times on each side!

Namaste!

Exercise of the Day: One-Legged Wall Sit

Time to work on those legs and get your butt in gear....the countdown to summer is in full throttle!!!

Today's Exercise of the Day is the one-legged wall sit. This exercise is great because you can do it pretty much anywhere, so no excuses!! Again, it can be modified while you build up your strength.

This exercise is an isometric exercise, meaning you hold your muscles are not moving, but are exerting maximum force to carry out an exercise. This is beneficial in toning and conditioning muscles and increasing muscle endurance. Just be sure to protect your joints when doing isometric exercises, as the joints affected by the isometric exercises are put under a lot of stress!


You can do this exercise with or without the fitness ball between your back and the wall. By adding the fitness ball, you add instability, which gives you an extra punch to your core.

1-Stand with your back facing a wall (place the fitness ball between your lower back and the wall at this point if you are using one).
2-Walk your legs straight out in front of you, keeping your back straight. Stop when your knees are over your ankles and your thighs are parallel to the floor.

At this point, you may already be feeling the exercise in your legs and not want to move on. If this is so, hold this position for 30 seconds to a minute.

3-If you want the extra challenge, raise your right foot off the floor, to at least a 45 degree angle. Keep your right ankle flexed to protect your ankle and knee. Hold this for 30 seconds to 1 minute.
4-Lower your right foot back to the point where the ankle is below the knee.
5-Raise your left foot off the floor, to at least a 45 degree angle, keeping your left ankle flexed. Hold this for 30 seconds to 1 minute.

Repeat the exercise to a point of exhaustion.

ENJOY!

Friday, March 16, 2012

Exercise of the Day: Calf Raises with a Fitness Ball

March Madness! I love college basketball and the NCAA tournament is the inspiration for today's Exercise of the Day: calf raises with a fitness ball. Strong calf muscles are vital to having great vertical leaps, as well as speed. Strong calf muscles also help prevent injury in the ankles, the upper thigh, and your lower back.

Though calf raises can be performed just about anywhere, especially anywhere you can stand on the edge of a step, I recommend using a fitness ball against a wall (see picture below) to add a bit of instability for extra core work.


Another recommendation I have is to not only do straight-leg calf raises, but also do calf raises with a slight bend in the knee. By bending your knee, you are increasing the use of your soleus muscle, which is close to your ankle. Straight leg calf raises tend to focus more on the development of your gastrocnemius.
File:Illu lower extremity muscles.jpg

Fun fact of the day: Dogs do not have a soleus muscle.

Inspiration of the Day: Yoga Ditty-Forearm Pose

There are a ton of cute little "Yoga Ditties" on the YogaWillSaveTheWorld site (http://yogawillsavetheworld.wordpress.com/category/the-yoga-tool-box/)

This one is so appropriate for today!


SO CUTE!
HAPPY FRIDAY!

Yoga Pose of the Day: Peacock Feather Pose

Peacock Feather Pose, or Pincha Mayurasana, is the pose of the day! I have not focused on an inversion yet, and I chose this one to because there are several different ways to modify it to make it applicable to your level of practice. Make sure that you are in a clear area before you attempt!

Inversions are great to include in your practice because they require your head to be below your heart, increasing blood flow into your brain and other vital organs.

Peacock Feather Pose is a forearm/elbow balance instead of a wrist balance pose, so those of you who are wary of putting strain or pressure on your wrist joints may find this inversion more inviting.

This pose works your entire body, though, more specifically, a lot of strength is built in your upper body and your core. On that note, make sure that you have properly warmed up and stretched your shoulders, spine, neck, and core before attempting the pose!


1-Come to a table-top position, on your knees and elbows, about one foot in front of a wall. You need to be absolutely positive that your elbows are directly underneath your shoulders!

2-Extend your forearms towards the wall, parallel to one another, and stretch out your fingers widely, making sure that your index finger is pointing directly at the wall.

3-Bring your legs and pelvis back as if going into Downward Dog Pose, keeping your forearms and shoulders in place. Really root yourself into your forearms at this point.

4-Activate your shoulders, really bringing them down into your back, away from your ears, and towards your lower body.

5-Using the strength and control of your core muscles, do a donkey kick with one of your legs and bring it up towards the ceiling. Let the other leg follow it in the same controlled motion.

6-Let your heels rest against the wall, keeping your feet and legs flexed and tight together, as if you are standing on the ceiling. The longer you hold the pose, the better it is for you. Try to last at least five breaths.

Alright, so if you're feeling good at this point and your balance is in check, you may want to attempt to bring your legs away from the wall, one at a time, and balance on your own. If you do this, remember to keep fully engaged in your arms, shoulders, and core. The wall is always there to go back to!

7-To come out of the pose, simply exhale and with control, bring your legs, one at a time back to the floor into a Down Dog position, and then bring yourself down into Child Pose to balance your body.

Inversions take practice, so don't get frustrated!!!! You'll do great!

Namaste.

Thursday, March 15, 2012

Exercise of the Day: Kettlebell Swing

Kettlebell workouts are a nice way to mix up your standard workout. Today I suggest trying the kettlebell swing.

The kettlebell swing is an especially great exercise if you are in a time crunch because it is a total body workout (especially your lower body and abs) and you get some cardio at the same time.

1-Stand with your feet hip width apart and set the kettlebell between your feet in front of you.
2-Come down into a squat. Remember to keep your knees behind your toes and your torso as upright as possible. This means shoulders down away from your ears and actively pressing into your back and keep your chest up. Don't roll your shoulders!!
3-Pick up the kettlebell and bring yourself up out of the squat.


This is super important. You need to use the momentum you create from coming out of the squat to be what drives the kettlebell forward. You want your shoulders to be in control of the kettlebell the entire time, not swinging it about. You could really hurt yourself if you don't maintain control.

4-Raise the kettlebell to the point where the kettlebell and your shoulders are even.
5-Slowly, AND WITH CONTROL!, lower yourself and the kettlebell back into the squat. That's one rep.

Repeat 12-15 more times. Rest for about 1 minute. Do another set of 12-15.

Again, I cannot say enough that CONTROL is KEY to a kettlebell workout. By maintaining control, you avoid injury and make sure that the exercise truly works the muscles properly. Plus, whenever you work to maintain control, you work your core, and we all want that!


ENJOY!

Healthy Tip of the Day: Add Color to Your Plate!

We see it all the time: the more colorful your meal (fruits and veggie wise), the better it is for us. Martha Stewart was on the NBC TODAY show this morning showing recipes, color by color, to help bring color to your plate!

Recipes include a blueberry-ricotta tart (YUM!) and roasted sweet peppers and carrots with orange and hazlenuts!

http://today.msnbc.msn.com/id/26184891/vp/46745291#46745291

Yoga Pose of the Day: Side Crane

Side Crane has been my arch nemesis now for several years. Finally, I can do it with confidence! I will be the first person to tell you that it takes a lot of practice to be able to get into this pose and hold it steadily. But the feeling of success you get once done......So excited!!

This pose is great for wrist and arm strengthening and, as you can tell in the picture, for working on your balance.


The Yoga Journal has an excellent step-by-step guide for how to get into this pose, as it is very complicated, and I cannot explain it better myself!

http://www.yogajournal.com/poses/2478

Practice, practice, practice!

Wednesday, March 14, 2012

Exercise of the Day: Reverse Plank

My clients have come to know the reverse plank very well by now. It is a fantastic core exercise that also engages your back, hamstrings, calves, and biceps.

0502_rev_plank_leg

1-Lay on the ground facing upwards.
2-Bend your elbows, placing your hands near your shoulders, your fingers pointing towards your feet.
3-Push up through your hands, raising yourself into the reverse plank position. Your wrists, elbows, and shoulders should be in one line.
4-Keep your entire core engaged, especially your glutes and hamstrings. You want to be a straight line from head to toe. Always remember that your shoulders are to be away from your ears and actively moving into your back and your chest is up. This will help reduce strain on your neck.

You can stay in this position for 30 seconds to 1 minute and repeat four more times for a total of five reps.

If you want to take it further:

5-From the reverse plank position, raise your right leg, toes pointed.
6-Hold your right leg perpendicular to your torso for about two counts.
7-Slowly lower your right leg back to the ground, resisting through your hamstrings and glutes, and the repeat the action with your left leg.
8-Alternate lifting your left and right leg for 30 seconds to 1 minute. Rest for about 30 seconds, then repeat the exercise four more times for a total of five reps.

Enjoy!

Healthy Snack of the Day: Grapes, Grahams, and Cream Cheese!

Today's healthy snack I found at http://www.laurenconrad.com/post/slim-tip-surviving-the-snack-attack

It's really quite simple: Take one graham cracker and split it in half. Take a low-fat or non-fat cream cheese and spread a little dollop on each cracker and then top each half with about eight grape halves.

This will help tide you over until meal time without taking a toll on your health!


Slim Tip: Surviving the Snack Attack

ENJOY!

Yoga Pose of the Day: Prayer Twist

Today's stretch (also a workout!) is Prayer Twist, or Namaskar Parsvakonasana. This pose helps build leg strength while opening up your chest and back, providing relief to your spine. I really like this pose because it is easy to modify for those who may have weaker leg muscles or if you find that going deep into the pose is simply not in your practice at the time. A good stretch in the back is always welcome!


To get into the pose:
1-Start by getting yourself into a lunge position, your right leg back. You want your left leg having a 90 degree angle at the knee, your left knee over your ankle and your left thigh as parallel to the ground as possible.

2-Turn your right foot to a 45 degree angle, pointing away from your body. If your lower body is feeling too much strain right now, you can easily modify the pose but placing your right knee on the ground.

3-Bring your hands to prayer in front of your chest, keeping your torso long and tall and facing forward.

4-On your next exhalation, twist your torso so that your right elbow comes to rest on the outside of your forward left leg. Hold the pose for four to five breaths.

Tips:
Keep your chest broad and try to bring your chest so that it is perpendicular with the ground.
Remember to keep your pelvis even and facing forward.

5-Take an inhalation and bring your torso back to an upright position. Switch your leg position in the lunge, your left leg now extended back, and repeat the exercise on the other side for another four to five breaths.

Namaste

Tuesday, March 13, 2012

Almond Banana Flaxseed Smoothie (Dairy Free)


I'm in love with this smoothie! I stumbled upon it while looking for different ways to mix in flaxseed into foods and the fact that this smoothie involves almond butter, bananas, and cinnamon.........I could not possibly be happier!! So good! Also, it's dairy free for anyone with lactose concerns.
 
Blend together 2 cups of vanilla almond milk, 1/4 cup of almond butter, 2 frozen ripe bananas, 2 tblspns ground flaxseed, 1/4 teaspoon of cinnamon, and 2 tblspns of honey (or whatever you use to sweeten, such as agave nectar).
That's it. Just blend it all together! 
ENJOY!

Pre-Summer Bootcamp in O'Fallon, Missouri!


This is such a great deal, so if you live in the St. Louis area and are interested, or know someone interested, check it out, or email me for any more details. This boot camp is going to be completely worth it and works you right up until the Saturday before Memorial Day, just in time for pool season!!!


ARE YOU READY FOR SUMMER?
Kickstart that Summer Body At Doran Fitness!!
Every Saturday for 8 weeks
April 7th-May 26th
From 9—10:30 AM
Cost: $100
Members: Bring a Friend and earn a free Personal Training Session!
Call 636-561-3297 or email daryl@doranfitness.com for details!
2315 Technology Drive, Suite 115, O’Fallon, MO 63368


Yoga Pose of the Day: Bird of Paradise

The Bird of Paradise Pose is my absolute favorite. I have no idea why, but whenever I do this one, I feel awesome.


1-Come into a wide-legged squat.
2-Bind your arms under your left leg: wrap your left arm over the front of your left leg with your left hand reaching back. Take your right arm behind your back and reach over to clasp your left hand.
3-Shift your weight onto your right leg. Make sure you get to a point where you feel that you have control of your body. If you continue without control, you are just going to fall over.
4-Slowly come up to a standing position. You may stay here with your leg bent if you'd like.
5-If you are feeling as if you can take the pose deeper, begin to straighten your left leg, toes pointed (like in the picture above).
6-Hold the bond and one-legged stance for four or five breaths.
7-Slowly bring your leg back to a bent position if extended, and then lower your body back down into a squat.
8-Unbind your arms from around your left leg, and shift the bind to your right leg, your right arm in front, and your left arm going behind your back.
9-Shift your weight to your left leg and come into a standing position, this time extending your right leg, toes pointed. Again, hold the position for four to five breaths.

Namaste.

Exercise of the Day: Tricep Pushup with Med. Ball

Tricep work!

This exercise is extremely beneficial: by keeping your hands closer together and your elbows against your sides, not only do you target your tricep muscles on the back of your arm, but you also engage the anterior (front) of your shoulders and your chest. By maintaining a perfect plank position with your back flat and glutes engaged, you also work your core. This exercise is extremely functional for multiple sports, such as surfing.


By all means, you do not have to do a tricep pushup on a medicine ball, as pictured above. This is a more advanced way of performing the exercise. The instability that the medicine ball provides gives an extra shock to your core which works even harder trying to keep your body in alignment.

To get into position for a tricep pushup without the medicine ball, get into a plank position, making sure that your wrists are directly below your shoulders. As you lower your chest towards the floor, keep your elbows next to your side, as opposed to bowing out as in a standard pushup. When you push your body back up, exhale and squeeze your abs, keep your elbows close to your side, and return to the starting position.

If you want to do a tricep pushup with the medicine ball, the directions are the same, except your hand position will be on the sides of the top of the ball. Still keep your elbows close to your side as you perform the movement. As always, keep your core engaged. As you get tired, your abs will save you from losing perfect form!!


Enjoy!

Monday, March 12, 2012

Exercise of the Day: 4-Exercise Tabata

It is absolutely gorgeous outside today and people all around here are just itching for pool season to start! You know what that means? Swimsuit season is upon us! Did you forget? Need to add a burst of calorie burning into your workouts to get ready? Try this tabata-style workout:

Exercise 1-Squat jumps. Do squat jumps as fast as you can for 20 seconds and then rest for ten seconds before Exercise 2.

Exercise 2-Squat thrusts (see pic below). Do squat thrusts as fast as you can for 20 seconds and then rest for ten seconds before Exercise 3.


Exercise 3-Mountain Climbers. Do mountain climbers as fast you can for 20 seconds and then rest for ten seconds before Exercise 4.

Exercise 4-Lateral Pushups. Do lateral pushups, alternating each side, for 20 seconds and then rest for ten seconds before returning to Exercise 1. Repeat the entire sequence again. This takes four minutes!

Enjoy and see you at the pool!!!

Yoga Pose of the Day: Standing Twisted Leg Extension

This move works your entire body! YES!


1-Stand in Mountain Pose, lengthening through your spine by pushing through your heels into the ground, and reaching through your head to the ceiling. Always remember: shoulders away from your ears and actively working towards your back, and chest up!

2- Raise your right knee to your chest and hold it there. This may be as far as you take this move if your balance does not allow you to advance. This is totally okay!!!!

3-Take your left hand to the outside of your right foot. Constantly keeping length in your spine, start to straighten your right leg, keeping your left hand in the same position.

4-Turn your torso to the right so it is perpendicular with your right leg.

5-Extend your right arm so that it is parallel with your right leg. Create in your mind the sensation that your right arm and your right leg are being pulled in opposite directions. This helps with balance.

6-Turn your head so you are looking over your right hand.

7-Hold this position for four or five breaths.

8-Turn your torso back to its starting position, and then bring your right knee back to the chest, then lower your right leg back to the ground. Repeat this pose, this time extending your left leg.

Sunday, March 11, 2012

Inspiration of the Day: Keep Going

Healthy Eating on Today's Limited Budget

Today is Sunday. For a lot of people, this is the time when you sit down and plan out your groceries and/or meals for the week. With the economy like it is and the prices of foods increasing constantly, this planning can be quite stressful and a focus on eating healthy goes away because of the common thought that eating healthy means spending more money.

Luckily, there are multiple resources available to us that will help us manage our money AND allow us to eat healthy, no matter how many people are in the household. I want to provide the links to two of these sources:


The Iowa State University Extension:
http://www.extension.iastate.edu/foodsavings/Plan/


Choose My Plate (this link has a listing of multiple valuable resources for budgeting a healthy menu!)
http://www.choosemyplate.gov/healthy-eating-on-budget.htm

l