"The greatest gift you can give another is not your treasure but to show them their own."
Saturday, March 31, 2012
Exercise of the Day: Tabata Tuck Jumps
PLYOMETRICS!!!!!
Time to get your cardio pumping and your lower body on fire! Today's Exercise of the Day is doing Tuck Jumps, tabata style! That's right....four minutes of muscle explosion! Tuck jumps also really work your abs because you are using them to pull your knees up to your chest! Tuck jumps are only slightly more involved than squat jumps, but not difficult to adapt into your workout.
1-Start in a standing position, core activated.
2-Jump straight up, flexing your lower abs and legs to bring your thighs towards your chest. Aim to bring your thighs even with your hips.
3-When you land, make sure you land on your toes first rather than the flat part of your feet to avoid injury in your knees and ankles.
Okay, now we need to apply this to a tabata.
Do tuck jumps for 20 seconds and then rest for 10 seconds. Repeat this eight times, so you do a total of 4 minutes of exercise. Your heart will be racing and your legs on fire, but it's totally worth it!!
ENJOY!
Friday, March 30, 2012
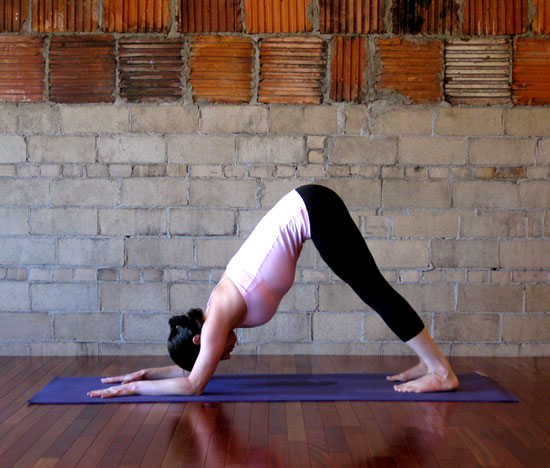
Yoga Pose of the Day: Quarter Dog
As usual, Friday=Hot Yoga Day! Today at Kathy Vanderselt's class at Yoga Source there was one move that I felt an amazing stretch in that worked wonders for all the upper body (especially chest and shoulders) I have been focusing on all week: Quarter Dog, or Catur Svanasana.
Quarter Dog has many benefits. For people with wrist issues, you can get all the benefits of Downward Dog without the strain on your wrists because your forearms are on the ground. By placing your forearms on the ground and pushing back through your heels and lengthening throughout your torso, you also hit a different angle of your upper body, increasing the stretch throughout your chest.
1-Begin in Downward Dog, creating length in your torso, stretching your pelvis to the ceiling, and grounding your body both in the heels and your palms.
2-Spread your fingers wide and bring the heads of your thumbs together. Make sure that your middle fingers are extending straight forward in front of you.
3-Lower your forearms to the ground, or as low as your body allows. Keep your forearms and elbows parallel.
4-Straighten your legs as much as you can, working on bringing your heels to the ground. At the same time, relax your head as low as possible between your arms. Create length in your arms by grounding your forearms into the ground and stretching your torso up to the ceiling.
5-Hold this position for five deep breaths.
Namaste.
Exercise of the Day: Preacher Curl
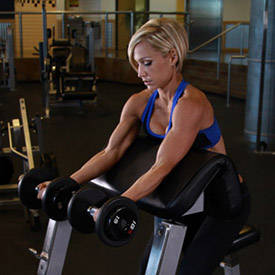
Today's Exercise of the Day is the Preacher Curl. Time to pump up your biceps!!
There are many variations you can do of the Preacher Curl. You can use two dumbbells (as pictured below), one barbell or E-Z bar, cables, tubing, Keiser machines, incline benches.......the list goes on and on. Versatility means that you can find the version that best suits your style of working out, or just mix up your approach to avoid boredom in the gym!
1-Grab two dumbbells and place your upper arms on top of the preacher bench or an incline bench. Have your biceps flexed so that the dumbbells are even with your shoulders and your forearms are facing you.
2-Take a deep inhalation and extend your forearms forward, facing upwards. Be careful to NOT overextend your elbows so that you do not place to much strain on your elbow joints and keep your wrists active so not to overextend your wrist joint as well.
3-As you exhale, flex your biceps and curl the dumbbells back to the starting position, at shoulder height.
4-Hold the contraction in your bicep for at least another count. This is one repetition.
Do 12-15 repetitions.
ENJOY!
Thursday, March 29, 2012
Healthy Snack of the Day: Coconut Carrot Juice
It's lunch time. You're hungry and you need to keep your hydration going, and know you're getting healthy vitamins and minerals on the way. This juice blend of coconut milk, carrots, and coriander is amazing. Try it out, I promise you'll like it!!!
Juice two carrots' stalks, then blend the carrot juice with a handful of coriander and 4 oz of coconut milk.
That's it!!! Enjoy!!
Exercise of the Day: Inverted Row
I ADORE the inverted row. This a great way to tone up and strengthen your shoulders and upper back, and if you are too nervous or simply have not built up the strength to do a pull-up, inverted rows are an excellent option!
First I'll talk about the modified version, as pictured above.
1-Secure a barbell about waist height and then lay down, face up, on the floor. Your chest needs to be directly under the barbell.
2-Extend your arms, grasping the barbell (wrists facing outwards), keeping your arms at shoulder width.
3-Bend your knees so that your knees and ankles are in line with one another. You want to keep your glutes and core activated so that your thighs and back stay parallel to the floor while in this position.
4-Activate your shoulders, arms, and upper back and bring your chest to the barbell. Hold this position for 1-2 breaths.
5-Slowly, with control, and your core remaining tight, lower yourself back to the starting position where your thighs and back were parallel with the floor.
Aim for doing 12-15 reps in perfect form.
This next picture is a harder version, in which your legs are straight, your heels pushing into the floor. All the movement is the same except the leg position.
And then finally, the hardest version in which you'll really fire up your core, is when you place your heels onto a fitness ball and try to maintain your balance while doing the inverted row! It's a KILLER!
Hope you enjoy it!
Wednesday, March 28, 2012
Fitness Product of the Day: oGorgeous Pleated Pocket Gym Bag
It's been awhile since I have shared one of my favorite fitness products, so I wanted to tell show everyone the oGorgeous Pleated Pocket Gym Bag:
http://www.ogorgeous.com/product/pleated-pocket-gym-bag-in-chrome-dazzle
I'm in love with this bag. I'm actually in love with just about everything on the website: http://www.ogorgeous.com/
oGorgeous sells apparel, gym bags, yoga bags, mat slings, and various accessories that are great. And it's not just shine and sparkle, there are items for those of you who like to keep it more simple and sleek as well, such as the Flomme Yoga Bags!
Go check out the oGorgeous website, I guarantee you'll find something you like!
Exercise of the Day: Swiss Ball Y Raise
Halfway through upper body week! Today's Exercise of the Day is the Swiss Ball Y Raise. This exercise really hits your shoulders and works your arms. By laying your torso on the Swiss ball, you also give yourself a core workout. You can do the Y raise laying on an inline bench, however, if you want to feel more stable or a Swiss ball is unavailable.
1-Lay your torso against a Swiss ball. The top edge of your pelvis should rest on the fitness ball. Contract your glutes and abs to maintain an even lower back. Your arms will be hanging straight down from your shoulders, and your palms face each other.
2-Raise your arms so that they are even with your shoulders and somewhere between 30-45 degrees away from your head so you form a Y-shape. Do not raise your arms too high past shoulder-level as this may cause over-extension.
3-Hold the Y-position for 1 to 2 breaths and then slowly and with control lower them down to the starting position.
4-Do 12-15 repetitions.
If you choose to do the exercise with weights, the same movement applies. However, if you want to use heavy weights, I recommend NOT using a Swiss ball, as the instability and heavy weights in combination further add to your chance of injury and strain.
ENJOY!
Tuesday, March 27, 2012
Yoga Pose of the Day: Cat Cow
Again, this week is upper body week, so I'm focusing on good stretches for our shoulders. Today's Yoga stretch is the Cat Cow sequence. Cat Cow is great for opening up your shoulders and upper back!
1-Begin in Table Top, hips over knees, shoulders over wrists.
2-As you take an inhalation, roll your upper back and press it upwards towards the ceiling, keeping your shoulders and wrists, and your knees and hips, aligned with each other. Feel a release in your upper back. This is Cat.
3-When you exhale, bring your upper back down and raise your glutes to the ceiling, creating the exact opposite shape in your torso as you did in Step 2. This is Cow
4-Repeat this cycling of Cat Cow with your inhalations and exhalations for five to seven breaths.
5-When you are finished, sit your glutes back onto your heels into Child Pose, extending your arms forward and pushing your glutes back. Feel a stretch all along your spine and take five deep breaths.
Namaste.
Exercise of the Day: Arnold Press
Second day of our upper body focus! Today's Exercise of the Day is the Arnold Press!
The Arnold Press is great for toning up your shoulders and arms (specifically your triceps), plus you sneak in a core workout.
1-Begin in a seated position, dumbbells in each hand. You can either sit on a bench, as seen in above, or add in some instability by sitting on a fitness ball. You can also do this exercise standing.
2-Curl the weights so that your elbows are resting at your sides and your palms are shoulder height, facing you (again, you can see this in the picture above).
3-Start to press the weights overhead. While you do this, begin to rotate the weights so that your palms will face away from your body. Your arms will end in the position demonstrated in the picture below.
4-To bring your arms down, slowly and with control, lower your elbows back down to your sides, rotating the weights back to their starting position, palms facing your body.
Do 12-15 repetitions of the Arnold Press.
Enjoy!
Monday, March 26, 2012
Healthy Tip of the Day: Anti-Aging Foods
Today's Healthy Tip comes from the girls at The Beauty Department. They have a post dedicated to foods that help keep your skin healthy, including a few recipes that are very simple.
Check it out here: http://thebeautydepartment.com/inspirations/
My favorite recipe is the Protein and Anti-Oxidant Smoothie:
10 oz coconut water
1/2 cup blueberries
2 tsp raw cacao powder
1 1/2 scoops of hemp protein
Blend, Ice, Enjoy!!!
Check it out here: http://thebeautydepartment.com/inspirations/
My favorite recipe is the Protein and Anti-Oxidant Smoothie:
10 oz coconut water
1/2 cup blueberries
2 tsp raw cacao powder
1 1/2 scoops of hemp protein
Blend, Ice, Enjoy!!!
Yoga Pose of the Day: Seated Yoga Mudra
If you just did the Exercise of the Day: Dive Bomber, you will really enjoy the Yoga Pose of the Day: Yoga Mudra.
Yoga Mudra is a chest opener, and a wonderful pose to do anytime you finish a workout involving push-ups or chest presses. Because we often activate our chest in motions we carry out every day (such as picking things up off the floor and simply sitting in front of our laptops),Yoga Mudra stretches benefits our body's wear and tear from daily activities in addition to strenuous workouts.
1-Begin sitting either cross-legged or sitting with on your feet, your things extended straight in front of you and parallel to one another. What seated position you use is determined by your comfort level and the condition of your knees.
2-Sit with a straight torso, being very aware of a stretch in your spine, grounding your hips in the floor, but extending your head to the ceiling. Make sure your chest and shoulders and active, shoulders away from your ears and working down into your back.
3-Clasp your hands together at your lower back.
4-Begin to lower your chest to your thighs. At the same time, pull with your hands so that your shoulders are stretching backwards, opposite of the direction your chest is moving. It is important that you keep leading with your chest and not your head, and try to keep your glutes resting in the same position.
5-When you have reached your deepest point of bend with your torso, make sure your arms are extended straight overhead.
6-Really pull with your hands, as if there is a rope attached to the ceiling pulling your arms and shoulders upwards, while you resist moving up with your chest.
Feel the stretch and release in your chest for five breaths.
7-Slowly inhale and bring yourself back up to the starting seated position. Remember not to roll your back-literally mimic the movement you used to bring yourself down.
Namaste.
Exercise of the Day: Dive Bomber
This week I'm going to be focusing a lot on the upper body. Today's Exercise of the Day is the Dive Bomber.
The Dive Bomber works your entire core and your chest, arms, and shoulders.
1-Start in a Downward Dog position. Push through your heels into the floor and create length in your back and legs. This is Step A in the picture.
2-Bring your upper body forward so that your shoulders are over your wrist.
3-Lower yourself into a tricep pushup/Chatarunga pushup, keeping your entire body activated. This is Step B in the picture.
4-When you reach the lowest point you can keep your chest hovered over the ground, push your chest forward, and bring your torso upright. You should be in Upward Dog Pose.
5-Bend your elbows near to your side and shift your upper body back into the hover position, as seen in Step B.
6-Push your glutes back and end in the Downward Dog position.
Do 12-15 repetitions of the Dive Bomber.
Enjoy!
Subscribe to:
Posts (Atom)